LSP and Xtext Tutorial: Creating the VS Code Client
This post is a continuation of my LSP and Xtext Tutorial. In my latest post I created a language in Xtext to be used with a client. In this post I am going to create VS Code plugin to connect to the language server created in the previous post. The full code for this example can be found here.
The VS Code Plugin
VS Code plugins are created using yeoman. Yeoman is a scaffolding tool, it creates the necessary files to start your project. For our VS Code plugin, we can use it to generate most of the plugin and then we proceed to customize it for our language. For those coming from the Eclipse world, yeoman is a wizard that we can launch from the command line. The installation of yeoman is outside of the scope of this tutorial.
Launching Yeoman
Yeoman’s command is yo. To start the scaffoling of a VS Code extension we launch the following command:
$ yo code
_-----_ ╭──────────────────────────╮
| | │ Welcome to the Visual │
|--(o)--| │ Studio Code Extension │
`---------´ │ generator! │
( _´U`_ ) ╰──────────────────────────╯
/___A___\ /
| ~ |
__'.___.'__
´ ` |° ´ Y `
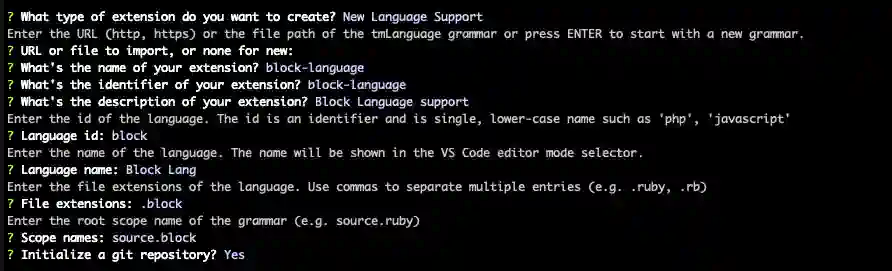
? What type of extension do you want to create?
New Extension (TypeScript)
New Extension (JavaScript)
New Color Theme
❯ New Language Support
New Code Snippets
New Keymap
New Extension Pack
New Language Pack (Localization)
New Web Extension (TypeScript)
New Notebook Renderer (TypeScript)
We select “New Language Support” and proceed to create the extension as follows:
Adding dependencies
The first step is to add the dependencies. We can do this by using node to modify the package.json file. We use the following commands from a terminal at the base of the repository:
$ npm install @types/node -D
$ npm install @types/vscode -D
$ npm install typescript -D
$ npm install vscode-test -D
$ npm install vscode-languageclient
This downloads the node dependencies and modifies the package.json.
The plugin code
The plugin code is written in Typescript. To build it we need to configure the compiler, write the actual code to activate the client, and finally configure the plugin to run the code when a .block file is open.
The compiler configuration
The compiler configuration is done using the tsconfig.json. The configuration file is below:
{
    "compilerOptions": {
        "target": "es6",
        "module": "commonjs",
        "moduleResolution": "node",
        "sourceMap": false,
        "inlineSources": false,
        "declaration": true,
        "stripInternal": true,
        "lib": [
            "es6"
        ],
        "outDir": "out"
    },
    "include": [
        "src/**/*.ts"
    ]
}
This file configures the plugin to use the src folder to contain the Typescript sources, output the js files to the out directory and also adds some compiler options.
The code to activate the client
The code to activate the client is below:
'use strict';

import * as net from 'net';

import { Trace } from 'vscode-jsonrpc';
import { workspace, ExtensionContext } from 'vscode';
import { LanguageClient, LanguageClientOptions, StreamInfo, Position as LSPosition, Location as LSLocation } from 'vscode-languageclient/node';

export function activate(context: ExtensionContext) {
    // The server is a started as a separate app and listens on port 5007
    let connectionInfo = {
        port: 5007
    };
    let serverOptions = () => {
        // Connect to language server via socket
        let socket = net.connect(connectionInfo);
        let result: StreamInfo = {
            writer: socket,
            reader: socket
        };
        return Promise.resolve(result);
    };

    let clientOptions: LanguageClientOptions = {
        documentSelector: ['block'],
        synchronize: {
            fileEvents: workspace.createFileSystemWatcher('**/*.*')
        }
    };

    // Create the language client and start the client.
    let lc = new LanguageClient('Xtext Server', serverOptions, clientOptions);

    lc.trace = Trace.Verbose;
    let disposable = lc.start();

    // Push the disposable to the context's subscriptions so that the
    // client can be deactivated on extension deactivation
    context.subscriptions.push(disposable);
}
This code uses the VS Code API to create a LSP client that is launched when the activate function is run. It basically configures the client to use our server on port 5007 and on localhost, and the starts the client.
The wiring
Now that we have the code to be run and the configuration to build it. We use the package.json file to tell VS Code to activate the plugin when the block language is loaded and to use the extension file as entry point. The final package.json is presented below:
{
    "name": "block-language",
    "displayName": "block-language",
    "description": "Block Language support",
    "version": "0.0.1",
    "engines": {
        "vscode": "^1.66.0"
    },
    "categories": [
        "Programming Languages"
    ],
    // this is the activation configuration
    "activationEvents": [
        "onLanguage:block"
    ],
    // this is the extension config
    "main": "out/extension",
    "devDependencies": {
        "@types/node": "^17.0.18",
        "@types/vscode": "^1.64.0",
        "typescript": "^4.5.5",
        "vscode-test": "^1.5.2"
    },
    "dependencies": {
        "vscode-languageclient": "^7.0.0"
    },
    "contributes": {
        "languages": [
            {
                "id": "block",
                "aliases": [
                    "Block Lang",
                    "block"
                ],
                "extensions": [
                    ".block"
                ],
                "configuration": "./language-configuration.json"
            }
        ],
        "grammars": [
            {
                "language": "block",
                "scopeName": "source.block",
                "path": "./syntaxes/block.tmLanguage.json"
            }
        ]
    }
}
Testing the whole
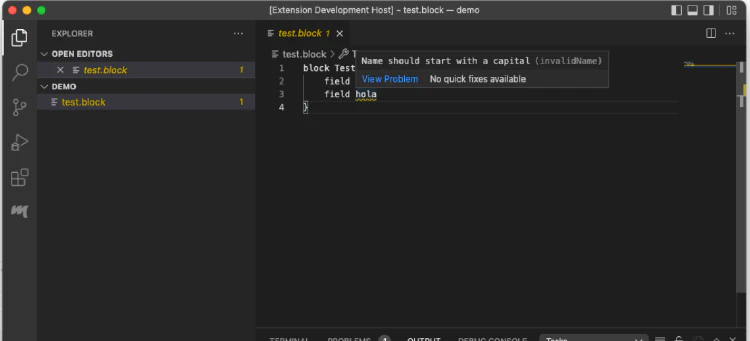
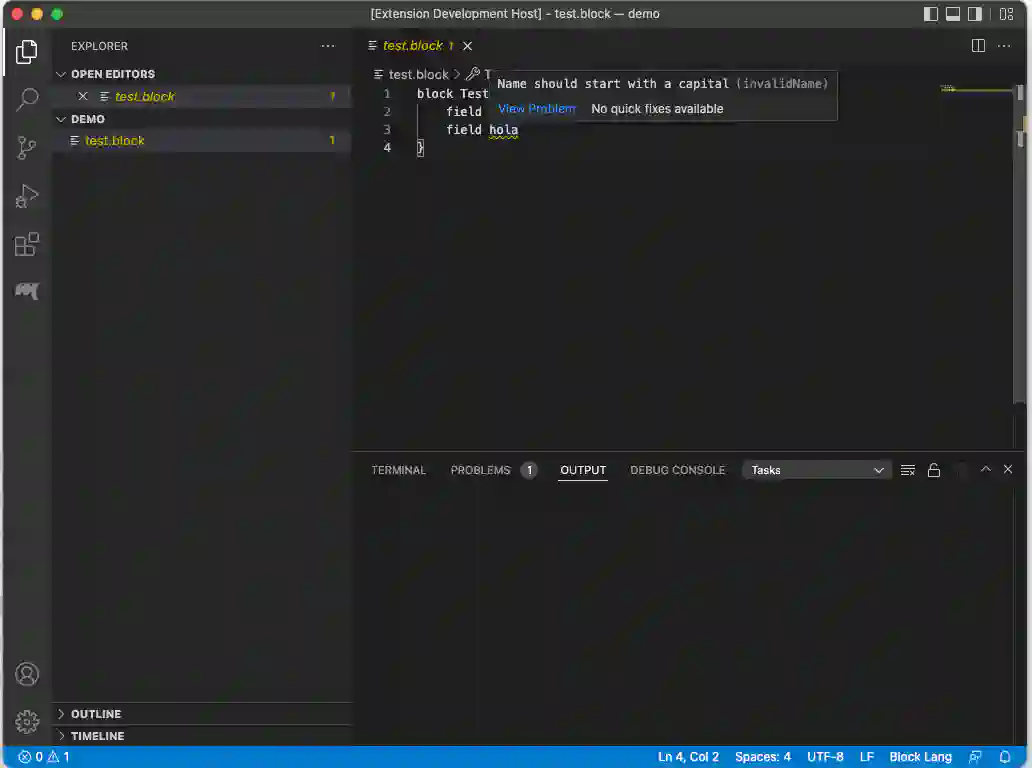
We can now launch the server from the previous post in the console and launch a VS Code instance with our plugin running. This is done by pressing F5. Below is an image of the new editor with a validation on the code.
The previous chapter of this tutorial is here: The next chapter of this tutorial is here: LSP and Xtext Tutorial: Creating the language